Many freelancers, marketers, and professionals use Notion to organize their schedule and stay ahead of deadlines. The calendar view feature of Notion enables users to visualize pending activities and their deadlines in a calendar format.
This means, you no longer need to dig into each task in the database to check its deadline, you can see that as soon as you open the calendar.
Here are the six steps to create a calendar in Notion:

1. Create a new page
To set up the calendar view, create a new Notion page inside your preferred folder. To do that, hover over the Notion folder within which you want to set up the calendar and click on the “+” icon next to it, as shown in the below image.
Notion will immediately create a subpage and open it for your access. You can then name the page, set an icon, and add a cover image if you want.
2. Set up the Notion Calendar View Block
Let’s set up the calendar now. To do that, type “/calendar” anywhere inside the newly created empty page and click on the “Calendar” block as demonstrated below.

3. Link to an existing database or create a new one
Next, as displayed in the below image, Notion gives you an option for creating a new database from scratch or to pull up data from an existing database within the same workspace.

4. Add tasks to the calendar
Here’s what the calendar looks like. It is a Social Media Calendar that displays the scheduled social media posts in a calendar format. However, there is only one task added currently.

Let’s add another.
To add a new task to the calendar view, hover over the date where you want to add the task. Notion will show a “+” sign — click on it to create a new calendar item that opens into a new page.
5. Update the tasks
The empty task view comes with all the properties that are associated with the linked database. You can add new properties if you want. You can also add content in the body of the card.
In the below example, we added an image to the card. The “Go-live date” is automatically set based on the date you chose while creating this task, however, you can easily set it to another date.

You can also add a reminder for this task to prompt Notion to send a notification at a specific date and time.
6. Use the filter option
The “filter” option, visible next to the “New” button, enables you to display only those cards that meet a specific criteria.
You can set filters on the properties set for the calendar. In our example, we have “Post Type” as one of the properties. It takes only these values - “Carousel”, “Text”, “Image”, “Gif”. You can apply a filter to see only one type of social posts.
FAQs
How to create a content calendar with Notion?
You can create a content calendar in Notion by using the databases feature. Create a new database, add topics, deadlines, design and other items to each card. You can then transform the tabular database into a calendar by changing the “view” to calendar if you want.
How to embed a Google Calendar in Notion?
You can easily embed the Google calendar by using the “embed” block in Notion. You can simply paste the calendar link in a Notion page to embed the calendar, but you need to ensure that the access to the Google calendar is set to “public”. This means, anyone with the link to the calendar can access it.
Is there a calendar template in Notion?
Notion has ready to use templates for a variety of calendar types. But if you intend to use a basic calendar, check out this template.
How do I add a calendar icon to Notion?
Type “/emoji” in your Notion page and click on the “Emoji” block. Next, type “calendar” to access different icons that resemble a calendar. Click on the one that you like the best to copy it to your page.
How do I create a weekly calendar in Notion?
To create a weekly calendar in Notion, open the calendar database and click on the “...” icon, next to the “New” button. Next, click on “Layout” to see more options and click on the drop-down next to “Show calendar as”. In this drop-down, you will see the option to display the calendar in a “Weekly” or a “Monthly” format.
Your calendar is laid out in a “Monthly” view. Change it to “Weekly” to set up a weekly calendar.
How to resize a Notion calendar?
Use the Columns block to split the Notion page into smaller vertical segments, and drag and drop your calendar into one of the columns.
The Columns block allows creating 2-5 Notion columns. The more columns you add, smaller the size of each, and smaller the size of the calendar view database. You can resize the column width after adding the calendar, that would resize the calendar as well.
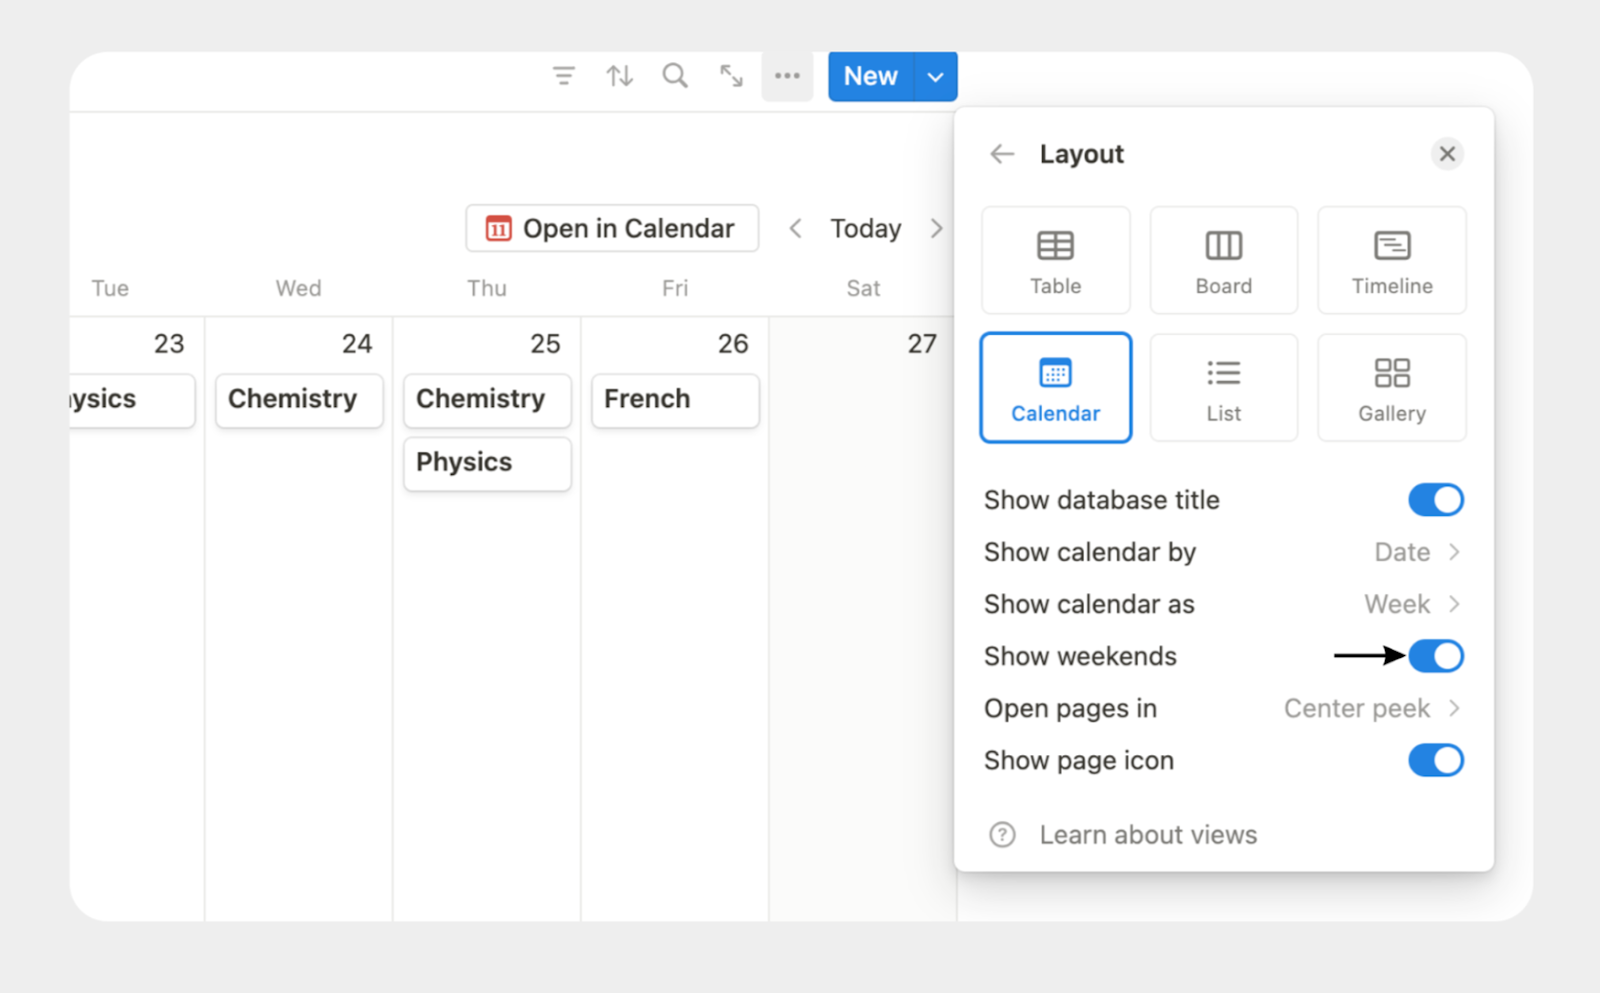
How to hide weekends in Notion calendar?
Click the three-dots icon, select the Calendar layout, and toggle off Show weekends.
How to set up a day view in the Notion calendar?
You can’t set up a day view in the Notion calendar database view but you can set it up in Notion’s native calendar tool.
Click on the Day/Week/Month dropdown and select the Day option, as demonstrated in the below image.

How to hide the title of the Notion calendar?
Click the three-dots icon next to the title of your Notion calendar and click the Hide database title option.

To make the title show again, click the name of the calendar tab and click the Show database title option.

How to make the Notion calendar start on Monday?
Click the Settings & members option from your Notion menu, click Language & region, and toggle on Start week on Monday.

How to print a Notion calendar?
Notion does not support the print function but here’s a workaround:
1. Open the Notion calendar in full-view
2. Click the three-dots icon at the top-right of the calendar page
3. Select the Export option
4. Customize the export settings:
- Export in PDF format
- Select Current view for the Include databases option
- Customize other options
5. Click the Export button
6. Open the PDF in your Windows or Mac
7. Click on the File option and click the Print option
8. Select the printer and hit the Print button
